01-prometheus介绍及部署
prometheus介绍
1.什么是Prometheus
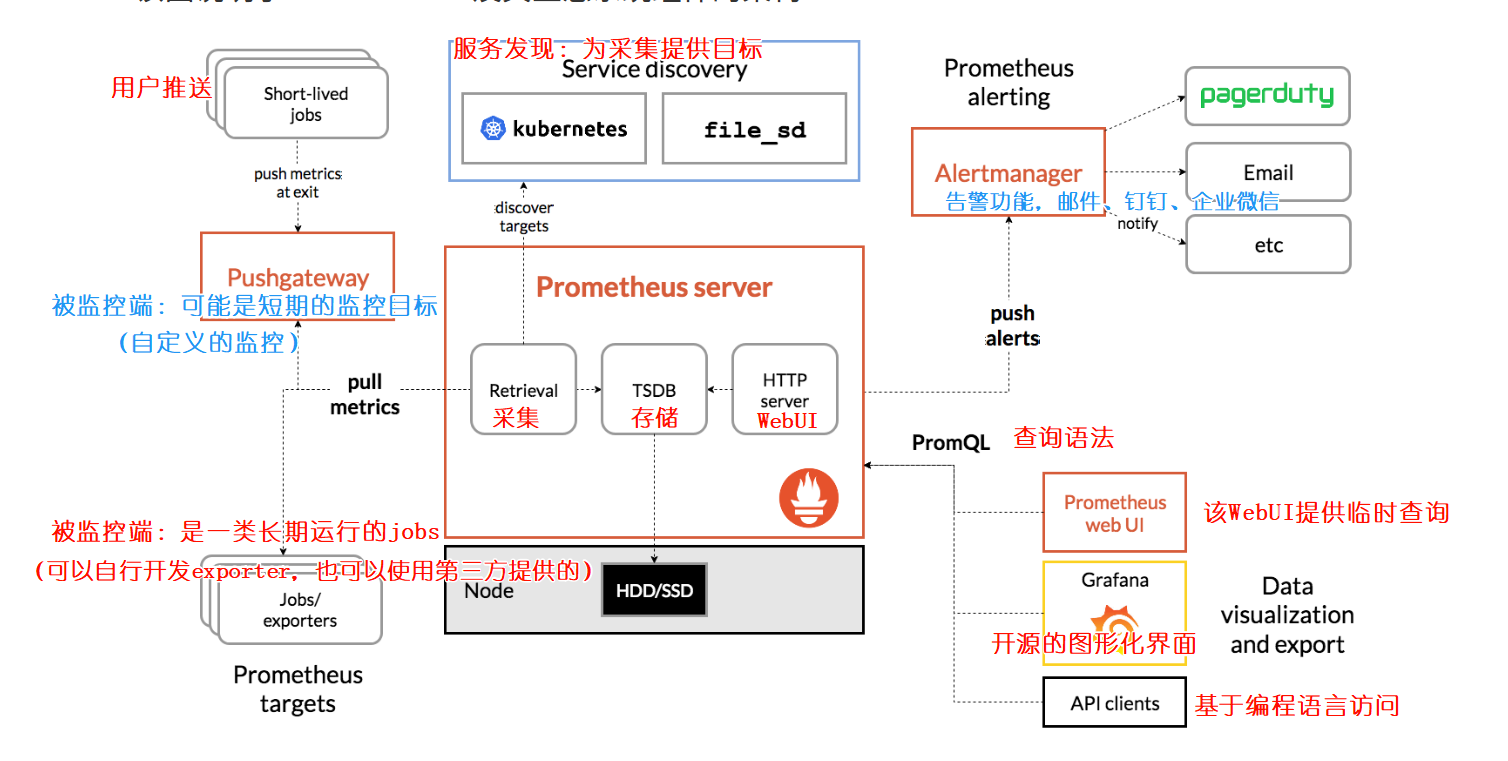
Prometheus是一款监控系统,可以监控传统业务(tomcat,nginx,mysql,redis,elasticsearch),还能够监控云原生业务,比如docker,k8s监控。
官方链接:
https://prometheus.io/docs/introduction/overview/#architecture
推荐阅读:
云原生CNCF官网:
    https://landscape.cncf.io/
Prometheus的GitHub地址:
    https://github.com/prometheus/prometheus
Prometheus的官网地址:
    https://prometheus.io/
| 主机名 | WanIP | 角色 |
|---|---|---|
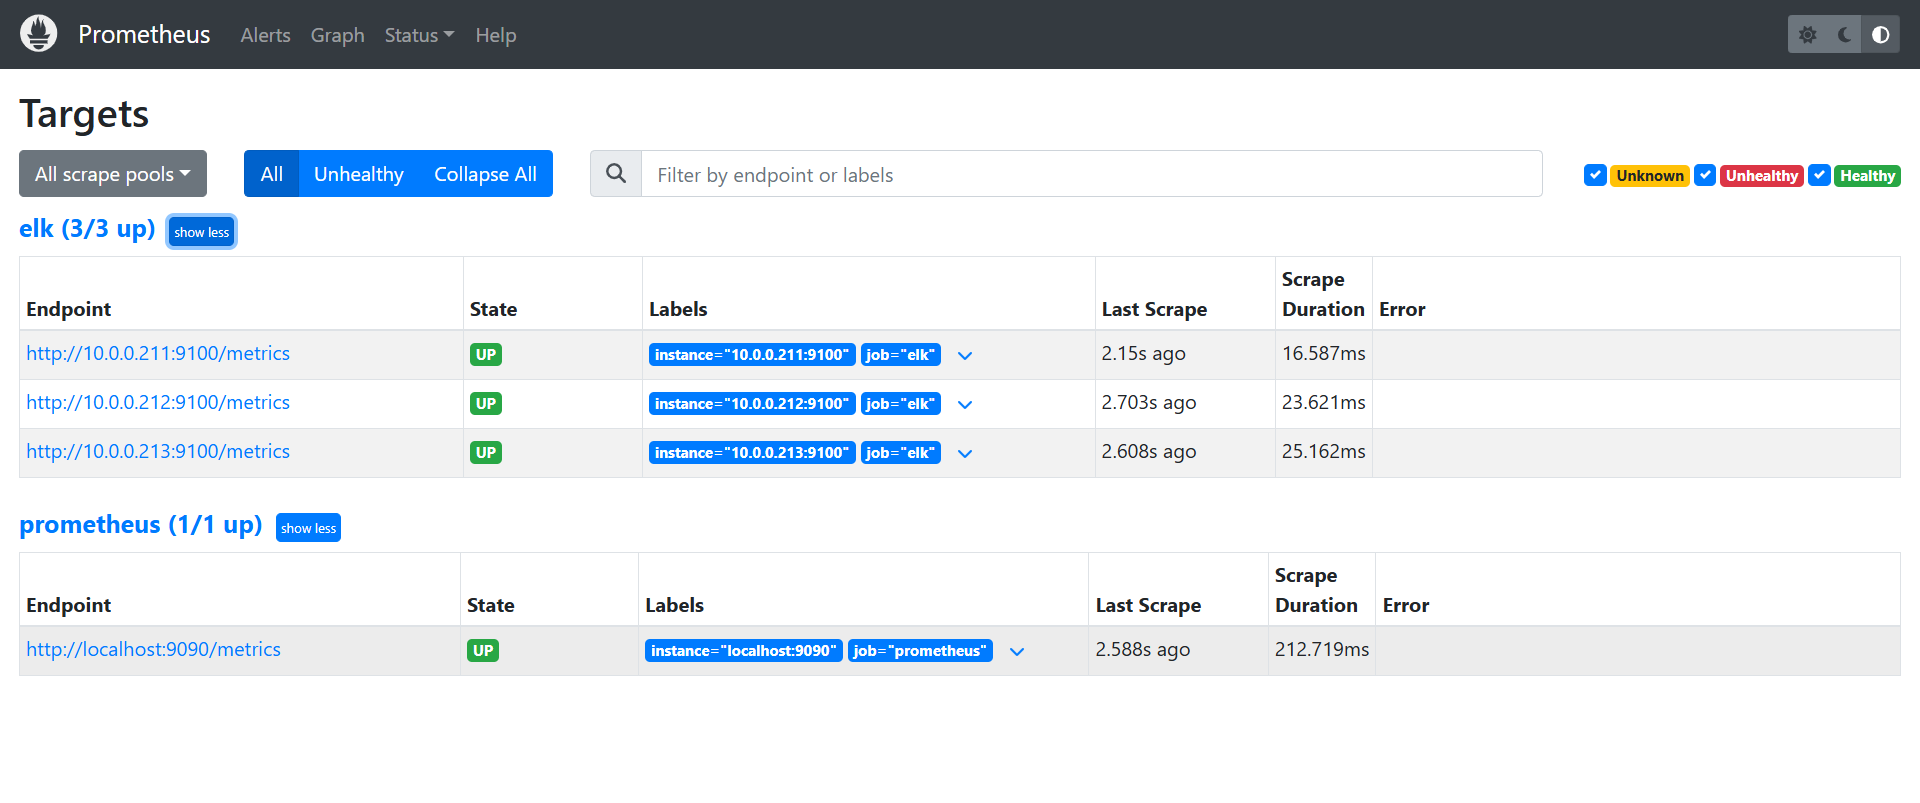
| elk01 | 10.0.0.211 | Prometheus服务端,安装Prometheus、node exporeter |
| elk02 | 10.0.0.212 | 被监控端,安装node exporeter |
| elk03 | 10.0.0.213 | 被监控端,安装node exporeter |
我的环境使用的是之前部署elk的环境,主机名所以都是elk,—无关紧要
二进制部署prometheus
本篇使用的是一键安装方式脚本部署,安装目录都在/software目录下k8s阶段可以使用云原生方式部署
**1.下载Prometheus server **
1 | [root@elk01 ~]# wget https://github.com/prometheus/prometheus/releases/download/v2.53.3/prometheus-2.53.3.linux-amd64.tar.gz |
**2.解压软件包 **
1 | [root@elk01 ~]# tar xf prometheus-2.53.2.linux-amd64.tar.gz -C /app/ |
**3.启动Prometheus server **
1 | [root@elk01 ~]# cd /app/prometheus/ && ./prometheus |
4.访问Prometheus的WebUI
1 | 10.0.0.211:9090 |
使用安装脚本一键安装prometheus,软件包放在同级目录的download里
2
3
4
5
6
7
8
9
10
11
12
13
14
15
16
17
18
19
20
21
22
23
24
25
26
27
28
29
30
31
32
33
34
35
36
37
38
39
40
41
42
43
44
45
46
47
48
49
50
51
52
53
54
55
56
57
58
59
60
61
62
63
64
65
66
67
68
69
70
71
72
73
74
75
76
77
78
79
80
81
82
83
84
85
86
87
88
89
90
91
92
93
94
95
96
97
98
99
100
101
102
103
104
105
106
107
108
109
110
111
112
113
114
115
116
117
118
#!/bin/bash
# auther: lugaojie
# blog: www.lukme.top
VERSION=2.53.2
ARCH=amd64
SOFTWARE=prometheus-${VERSION}.linux-${ARCH}.tar.gz
URL=https://github.com/prometheus/prometheus/releases/download/v${VERSION}/${SOFTWARE}
DOWNLOAD=./download #指定软件下载目录
INSTALLDIR=/softwares
BASEDIR=${INSTALLDIR}/prometheus-${VERSION}.linux-amd64
DATADIR=/data/prometheus
LOGDIR=/var/log/prometheus
HOSTIP=0.0.0.0
PORT=9090
HOSTNAME=`hostname`
function prepare() {
# 判断目录是否存在,若不存在则创建,-d指定目录,-o可以指定属主,-g指定数组
[ -d $INSTALLDIR ] || install -d ${INSTALLDIR}
[ -d $DOWNLOAD ] || install -d ${DOWNLOAD}
[ -d $DATADIR ] || install -d ${DATADIR}
[ -d $LOGDIR ] || install -d ${LOGDIR}
. /etc/os-release
if [ "$ID" == "centos" ];then
# 判断系统是否安装wget
[ -f /usr/bin/wget ] || yum -y install wget
fi
# 判断文件是否存在,若不存在则下载
[ -s ${DOWNLOAD}/${SOFTWARE} ] || wget $URL -O ${DOWNLOAD}/${SOFTWARE}
}
function deploy() {
# 检查环境
prepare
# 解压文件软件包
tar xf ${DOWNLOAD}/${SOFTWARE} -C ${INSTALLDIR}
# 生成启动脚本
cat > /etc/systemd/system/prometheus-server.service <<EOF
[Unit]
Description== Linux Prometheus Server
Documentation=https://prometheus.io/docs/introduction/overview/
After=network.target
[Service]
Restart=on-failure
ExecStart=/bin/bash -c "${BASEDIR}/prometheus \
--config.file=${BASEDIR}/prometheus.yml \
--web.enable-lifecycle \
--storage.tsdb.path=${DATADIR} \
--storage.tsdb.retention.time=60d \
--web.listen-address=${HOSTIP}:${PORT} \
--web.max-connections=65535 \
--storage.tsdb.retention.size=512MB \
--query.timeout=10s \
--query.max-concurrency=20 \
--log.level=info \
--log.format=json \
--web.read-timeout=5m &>> ${LOGDIR}/prometheus-server.log"
ExecReload=/bin/kill -HUP \$MAINPID
LimitNOFILE=65535
[Install]
WantedBy=multi-user.target
EOF
# --web.enable-lifecycle 指定webUI的热加载功能
# --storage.tsdb.path=${DATADIR} 指定存储路径
# --storage.tsdb.retention.time=60d 指定保留数据时间,默认15d
# --web.max-connections=65535 指定最大连接数
# --storage.tsdb.retention.size=512MB指定存储块大小,512M滚动一次
# --log.level=info 指定日志级别
# --log.format=json 指定日志格式
# 将服务设置为开机自启动
systemctl daemon-reload
systemctl enable --now prometheus-server
systemctl status prometheus-server
sleep 0.3
ss -ntl | grep ${PORT}
}
function delete(){
systemctl disable --now prometheus-server.service
rm -rf /etc/systemd/system/node-exporter.service $BASEDIR $DATADIR $LOGDIR
}
function main() {
case $1 in
deploy|i)
deploy
echo "${HOSTNAME} 的prometheus-server 已经部署成功![successfully]"
;;
delete|r)
delete
echo "${HOSTNAME} 的prometheus-server 已经卸载成功,期待下次使用~"
;;
*)
echo "Usage: $0 deploy[i]|delete[r]"
;;
esac
}
main $1
部署node exporter
1 | 部署过程同上,官网找到下载 |
一键安装exporter,软件包放在同级目录的download目录下
2
3
4
5
6
7
8
9
10
11
12
13
14
15
16
17
18
19
20
21
22
23
24
25
26
27
28
29
30
31
32
33
34
35
36
37
38
39
40
41
42
43
44
45
46
47
48
49
50
51
52
53
54
55
56
57
58
59
60
61
62
63
64
65
66
67
68
69
70
71
72
73
74
75
76
77
78
79
80
81
82
83
84
85
#!/bin/bash
# auther: lugaojie
# blog: https://www.lukme.top
VERSION=1.8.2
SOFTWARE=node_exporter-${VERSION}.linux-amd64.tar.gz
URL=https://github.com/prometheus/node_exporter/releases/download/v${VERSION}/${SOFTWARE}
DOWNLOAD=./download
INSTALLDIR=/softwares
BASEDIR=${INSTALLDIR}/node_exporter-${VERSION}.linux-amd64
HOST="0.0.0.0"
PORT=9100
hostname=`hostname`
function prepare() {
# 判断目录是否存在,若不存在则创建
[ -d $INSTALLDIR ] || mkdir -pv ${INSTALLDIR}
[ -d $DOWNLOAD ] || mkdir -pv ${DOWNLOAD}
if [ "$ID" == "centos" ];then
# 判断系统是否安装curl
[ -f /usr/bin/wget ] || yum -y install wget
fi
# 判断文件是否存在,若不存在则下载
[ -s ${DOWNLOAD}/${SOFTWARE} ] || wget $URL -O ${DOWNLOAD}/${SOFTWARE}
}
function install() {
# 检查环境
prepare
# 解压文件软件包
tar xf ${DOWNLOAD}/${SOFTWARE} -C ${INSTALLDIR}
# 生成启动脚本
cat > /etc/systemd/system/node-exporter.service <<EOF
[Unit]
Description= Linux Node Exporter
Documentation=https://prometheus.io/docs/introduction/overview/
After=network.target
[Service]
ExecStart=${BASEDIR}/node_exporter --web.telemetry-path="/metrics" \
--web.listen-address=${HOST}:${PORT}
[Install]
WantedBy=multi-user.target
EOF
# 将服务设置为开机自启动
systemctl daemon-reload
systemctl enable --now node-exporter.service
systemctl status node-exporter.service
ss -ntl | grep 9100
}
function remove(){
systemctl disable --now node-exporter.service
rm -rf /etc/systemd/system/node-exporter.service $BASEDIR
}
function main() {
case $1 in
install|i)
install
echo "${hostname} 的node-exporter 已经部署成功![successfully]"
;;
remove|r)
remove
echo "${hostname} 的node-exporter 已经卸载成功,期待下次使用~"
;;
*)
echo "Usage: $0 install[i]|remove[r]"
;;
esac
}
main $1
修改Prometheus文件
1 | #1.修改配置文件 |
关于metrics
过滤数据
Prometheus metrics 类型
- prometheus metrics type
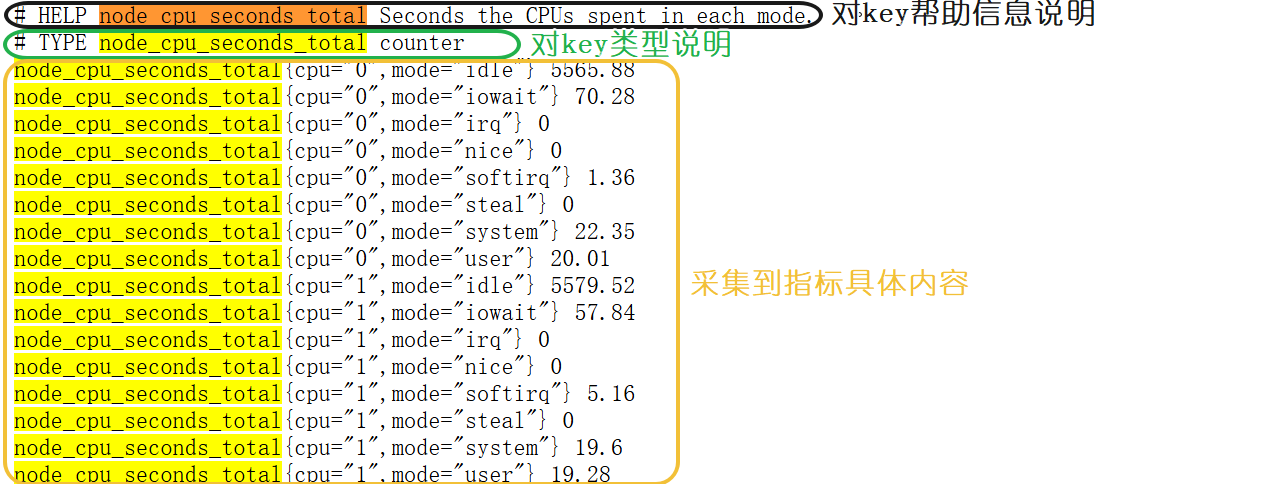
prometheus监控中采集过来的数据统一称为Metrics数据,其并不是代表具体的数据格式,而是一种统计度量计算单位。
当我们需要为某个系统或者某个服务做监控时,就需要使用到metrics。
prometheus支持的metrics包括但不限于以下几种数据类型:
guage:
最简单的度量指标,只是一个简单的返回值,或者叫瞬时状态。
比如说统计硬盘,内存等使用情况。
couter:
就是一个计数器,从数据量0开始累积计算,在理想情况下,只能是永远的增长,不会降低(有特殊情况,比如粉丝量)。
比如统计1小时,1天,1周,1一个月的用户访问量,这就是一个累加的操作。
histograms:
是统计数据的分布情况,比如最小值,最大值,中间值,中位数等,代表的是一种近似百分比估算数值。
通过histograms可以分别统计处在一个时间段(1s,2s,5s,10s)内nginx访问用户的响应时间。
summary:
summary是histograms的扩展类型,主要弥补histograms不足。
Prometheus的PromQL语法
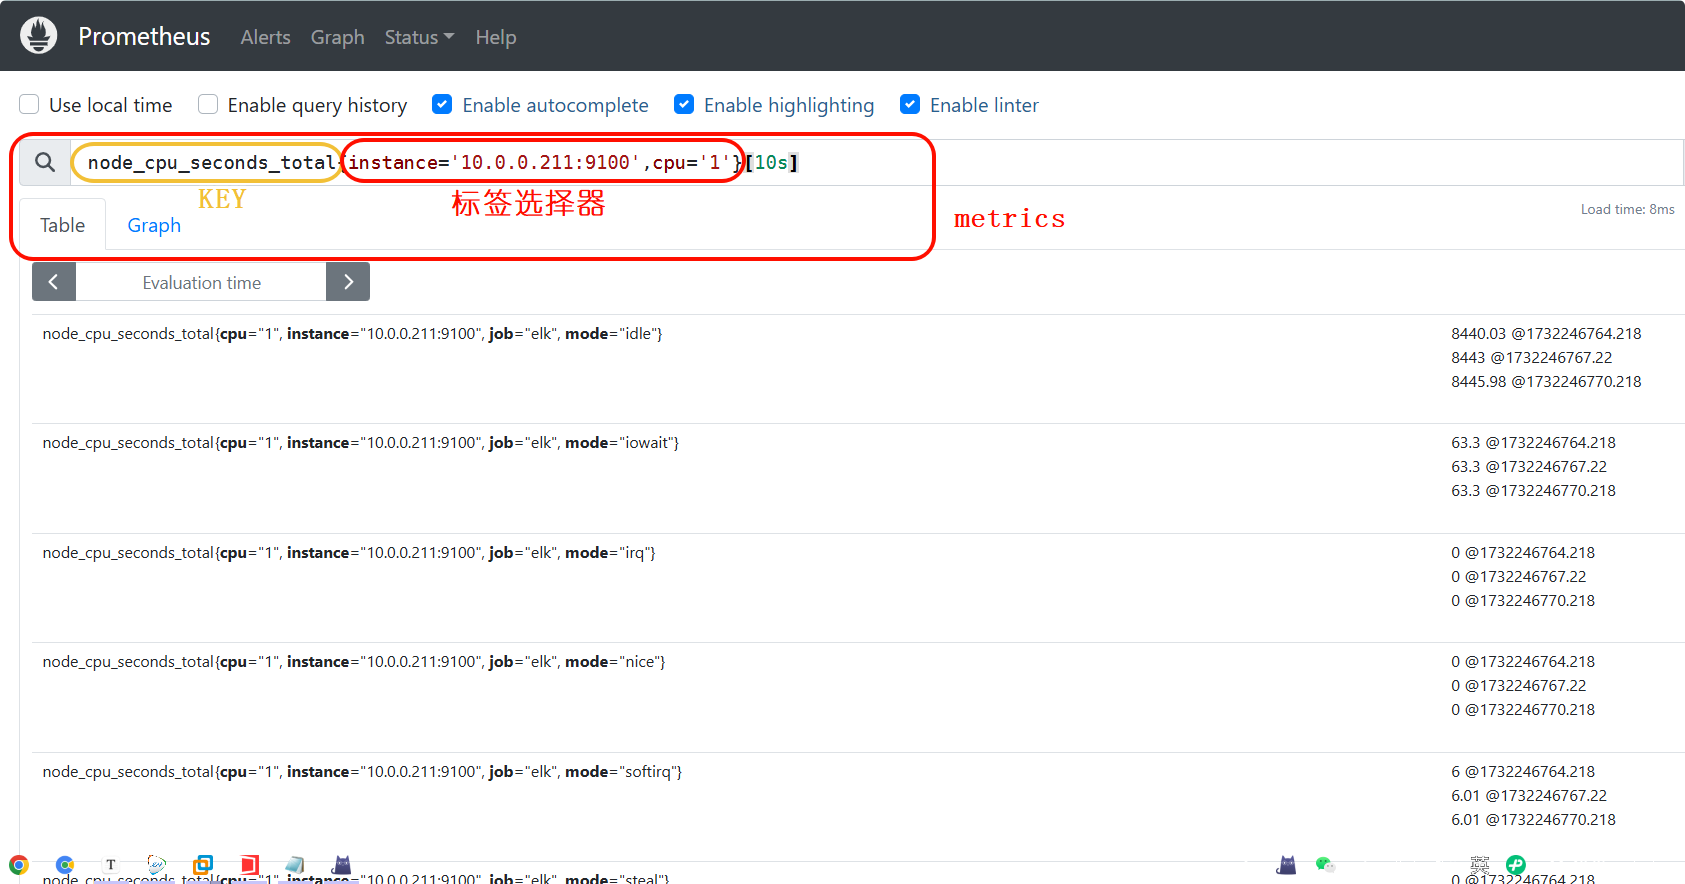
1 查看某个特定的key
node_cpu_seconds_total
2.查看某个节点的指标
1 | node_cpu_seconds_total{instance="10.0.0.211:9100"} |
3 查看某个节点的某刻CPU的某种状态
node_cpu_seconds_total{instance="10.0.0.211:9100",mode="idle",cpu="1"}
4 查询最近10s内某个节点CPU的某种状态时间
node_cpu_seconds_total{instance="10.0.0.211:9100",mode="idle",cpu="1"}[10s]
5 统计10s内,使用标签过滤器查看"10.0.0.211:9100"节点的第0颗CPU,非空闲状态使用的总时间
node_cpu_seconds_total{instance="10.0.0.211:9100",mode!="idle",cpu="1"}[10s]
6 统计10s内,使用标签过滤器查看"10.0.0.211:9100"节点的第0颗CPU,mode名称以字母"i"开头的所有CPU核心。
node_cpu_seconds_total{instance="10.0.0.211:9100",mode=~"i.*",cpu="0"}[10s]
7 统计10s内,使用标签过滤器查看"10.0.0.211:9100"节点的第0颗CPU,mode名称不是以字母"i"开头的所有CPU核心。
node_cpu_seconds_total{instance="10.0.0.211:9100",mode!~"i.*",cpu="0"}[10s]


